


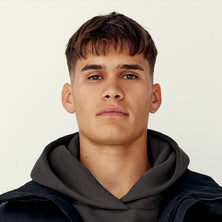
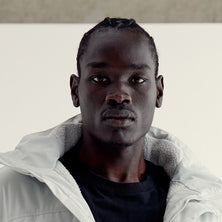
After Dark
ZeroCrease™
After Dark
ZeroCrease™
ZeroCrease™
This is a carousel. Use Next and Previous buttons to navigate.
This is a carousel. Use Next and Previous buttons to navigate.


| Size | Bust | Waist |
|---|---|---|
| AU 4 / XXS | 60-70 | 45-65 |
| AU 6 / XS | 70-80 | 55-65 |
| AU 8 / S | 80-90 | 65-75 |
| AU 10 / M | 90-100 | 75-85 |
| AU 12 / L | 100-110 | 85-95 |
| AU 14 / XL | 110-120 | 95-105 |
| AU 16 / 2XL | 120-130 | 105 -115 |
| AU 18 / 3XL | 130-140 | 115-125 |
| Size | Bust | Waist |
|---|---|---|
| AU 4 / XXS | 24-28 | 18-22 |
| AU 6 / XS | 28-32 | 22-26 |
| AU 8 / S | 32-36 | 26-30 |
| AU 10 / M | 36-40 | 30-34 |
| AU 12 / L | 40-44 | 34-38 |
| AU 14 / XL | 44-48 | 38-42 |
| AU 16 / 2XL | 48-52 | 42-46 |
| AU 18 / 3XL | 52-56 | 46-50 |
* All measurements are guides only. From time to time some people might find that their perfect size does not line up with the size chart data.
Bust:
Wrap measuring tape around the fullest part of the bust, ensuring the measuring tape is sitting straight across the back when taking the measurements. Once the measuring tape is in position keep the arms relaxed and by the side.
Waist:
Measure around the middle of your natural waistline, this should be approximately around where your belly button sits or just above.
Hot Tips 🔥
- The measuring tape should fit closely around the body without squeezing in any way.
- If some of your measurements fall in different sizes, we recommend going with the biggest size.


Engineered for effortless, elevated style, ZeroCrease delivers a smooth, structured look that resists wrinkles and holds its shape without the need for constant ironing or steaming. Shape that holds - Smoothness that lasts.
Our smooth, wrinkle-resistant fabric with a cool-touch sensation.
 Wrinkle Resistant
 Cool Touch
 Shape Retention
 Perfect For Travel
Designed to hold its shape, resist wrinkles, and sit “just right” all day. After Dark is made with ZeroCrease™, a smooth, structured fabric with a cool-touch feel that blends softness with anti-crease functionality. Clean, elevated, and easy to wear - perfect for travel, the daily grind, and everything in between.

Overall rating: 4.837209 / 5 from 172 reviews.
The AfterDark ZeroCrease Oversized Tee in White is praised for its comfortable and versatile fit, high-quality, wrinkle-resistant material, and excellent appearance. Customers appreciate its minimal branding and ability to maintain a perfect look throughout the day.
Review topics: ["size","fit","length","colour","fabric","material","design","shirt","quality","looks","sleeves","service","feel","shape","comfort","tee","style","cut","thickness","creases","balance","wear","staple","ironing","holds","sits","wardrobe","brand","crinkles"].
"I love these tees I currently have 2x black 1x navy 1x white These are my go to work tee. I style with some layered necklaces. I loathe ironing these fresh from the washing machine, dry on a coat hanger. Ready to wear no fluffing around. The fabric Is a great weight not to thick or thin. And a smooth feel nice quality fabric. I need to invest in the long sleeve of this as well."
"As a masculine presenting person. I love the seamless boxy look of these shirts. The quality it good, you can easily layer up for winter due to its oversized fit and also dress up or dress down casually. It hides my chest well as a women. I also find I can express how I want to present with ease."
"Review: It’s a good oversized tee overall. The fit is comfortable and relaxed. The fabric feels nice enough and the design is clean. solid option for casual wear or training."
"Perfect length, perfect over-sizedness without being outrageous, thick-ish but not super heavy, and it’s super nice and soft!"
"Love it. Super comfy and such a great cause."
"Great material and awesome design"
"My partner loves this shirt! The fabric is so soft and it's the perfect length for him."
"Great t-shirt. Super comfy and reassuringly thick and heavy"
"Comfiest tops - perfect fit and great quality."
"Material feels great and good size, very comfy"
Set your location for localised pricing,
currency and delivery options.
This is a carousel. Use Next and Previous buttons to navigate.

